


The second of four installments on using the Odoo developer mode.
Covered in this article:
- How to add a custom field to a model
- How to add a field to a form view
- The Odoo architecture field
- Overview of Odoo UI view types
The next step in your Odoo development expertise
In the first of our four-article series, “Introduction to Odoo Development Using the Developer Mode,” you learned about Odoo essential concepts and how to enable the developer mode. Having consumed vital Odoo information in conjunction with putting our budding Odoo development skills into action, it’s time to get to work making real changes using the developer mode.
In this article, we’ll take a step by step approach to how to add a custom field to an existing form using the developer mode, implementing yet another level of complexity into our Odoo to-do list application. This will act as an essential stepping stone that sets us up for success as we prepare to tackle the third article’s topic: Adding a new model using the developer mode.
That being said, let’s dive straight into adding a custom field.
Adding a custom field to a model
Adding a custom field to an existing form is a common customization. This can be done from the user interface, without the need to create a custom module.
For our to-do application, we want to select a group of people to collaborate on to-do items. First we need to identify your collaborators by setting a flag on their partner form. To do so, add an Is Work Team? flag to the Contact model (also known as the Partner model, as noted in the previous introductory article).
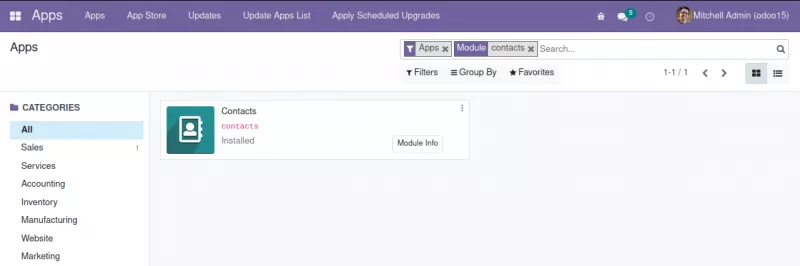
The Contact model is part of the Odoo core, and is available even if you haven’t installed any apps yet. However, you may not yet have the menu option available to visit it.
At this point, if the Contacts app is not available in the main menu, you should install it now. This can be accomplished in three quick and easy steps: Open the Apps top menu, search the application name, and install it.
Once the app is installed the Contacts application top menu option will be available.
Adding a field to the data model
Let’s start by adding a custom field to the data Model. It’s important to note that the process for adding a custom field was changed in Odoo 12, when the View Fields option was added to the developer menu. Depending on the version you’re working with, adding a field will follow one of the two sequences outlined below: Fields before and after Odoo 12.
Fields after Odoo 12
To access View Fields, open the Contacts app to locate the Contact main view. Click on the developer tools bug icon and select the View Fields option.
Fields before Odoo 12
For earlier versions, fields can be added and edited in the Settings | Technical | Database Structure menu. You can either use the Models or the Fields option.
Creating the field
Next, you will see a list with all the existing fields for the current Contacts model. Click on the Create button found at the top left. Fill in the details for the new field accordingly:
- Field Name: x_is_work_team
- Field Label: Is Work Team?
- Field Type: boolean
Note:
The Field Name must start with the x_ prefix. This is mandatory for models and fields created from the developer tools. Customizations made through addon modules don’t have this limitation.
Last, click save and our new field will be added to the fields list. By default the list view is limited to 80 records, so you will need to use the right arrow in the upper-left corner to navigate to the next page to see the new field, or edit the number of records to present, located next to the page navigation arrows.
Adding a field to a form view
Our new field is now available in the Contacts model (also known as the Partner model), but it is not yet visible in the user interface (UI). It needs to be given a view in order for us to access it. To do this, we will add it to the contact’s form view.
Note:
The form view is one of a handful of views used by the UI. For our purposes in this section, we will practice adding a field to the form view option only. But not to worry—we will go into greater detail describing the other view types in the last section of this article.
Go back to the Contacts list and open the form view, either by selecting one of the existing contacts or by clicking on the Create button.
We need to decide where in the form we want to add the field. For example, we could add it after the Tags field. This will be the extension point to use.
Hovering over the field shows us useful technical details for it, as shown in the following screenshot:
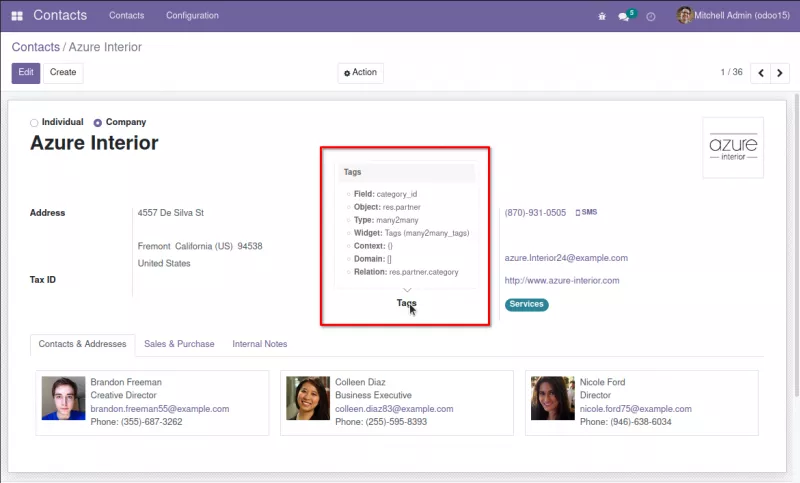
Next we need to locate the technical name of that field. Hover your cursor over the field’s label to expose the field name category_id.
We can now extend the form view to add that field. Click on the developer tools bug icon and select the Edit View: Form option. This opens a window with the form’s definition.
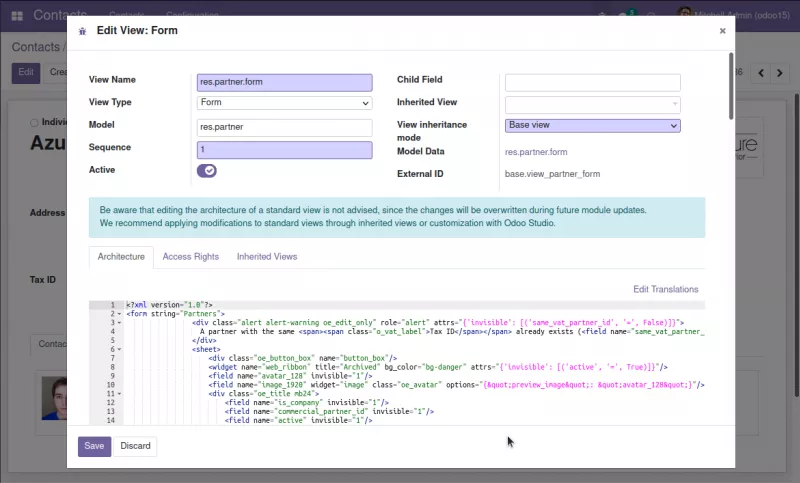
The Odoo architecture field and extension views
In the Architecture field, the XML for the base view is made visible. While we are indeed able to edit it directly, changes can be lost if the module adding it is upgraded. The correct, safe way to make your desired changes is to create an extension view.
When additional modules are installed, they can add more fields and visual elements to the base view. This is done using extension views, found in the Inherited Views tab. This is where we will be adding our own extension to the contacts form view.
Create the extension view
On the Inherited Views list, click on Add a line at the bottom, and create the extension view using these values:
- View Name: Some short description, such as Contacts Form extensions for To-do App.
- Architecture: An XML fragment, specifying an extension point and the content to add. Use:
The extension view should look this:
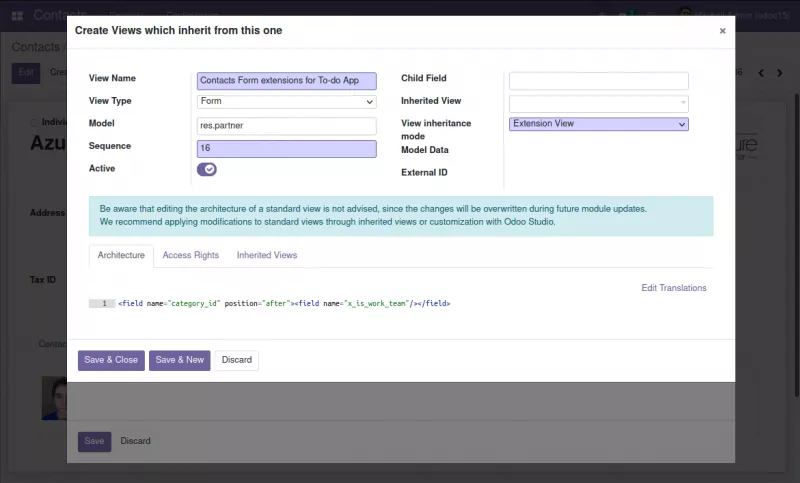
Now click on Save & Close. If your XML is correct, you’ll land back on the Inherited Views list, where our extension will also be included. Click Save to finalize the form changes, and close the Edit Form: View window by clicking on the x at the top right.
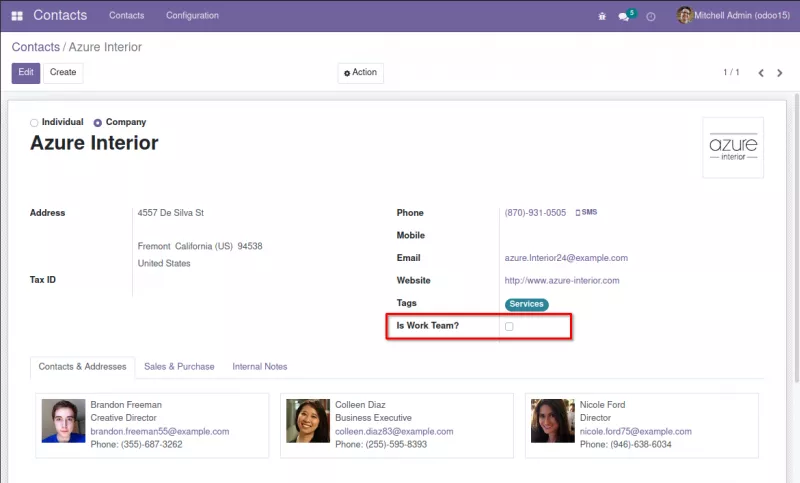
One you’ve completed these steps, the changes are officially made, but the form needs to be reloaded for us to see it. Reload the page with a standard refresh, and the Is Work team? field will appear under the Tags field, as shown below:
This completes the steps needed to add a custom field to a form view. Remember that forms are just one of the view types available; the Odoo UI uses other view types that each come with their own particular set of capabilities. In the following section, we’ll discuss view types in more detail.
Understanding Odoo user interface (UI) view types
In addition to the form view, the UI also uses other view types.
Kanban view
The initial view type for Contacts is a Kanban view, showing the records in data cards. Kanban views can also group the cards in columns. For example, the CRM App uses this in the initial view, the Pipeline. On a Kanban view, the developer menu will show an Edit View: Kanban option.
Tree (or List) view
The Tree view—also referred to as the List view—displays the records as a list. On a List view, the developer menu will show an Edit View: List option.
Search view
The Search view controls the behavior of the search box, at the top-right of the Kanban and List views, and the buttons under it, Filters and Group By. When a search box is visible, the developer menu will show an Edit View: ControlPanelView option.
Odoo’s view types are not limited to the four discussed in this article. The remaining available view types are explored in Chapter 10, “Backend views – Designing the User Interface,” of Odoo 15 Development Essentials.
Accessing view definitions in Odoo
You can access all the View definitions by using the Settings | Technical | User Interface | Views menu option.
Or, for a more focused alternative, use Settings | Technical | Database Structure | Models. Find the Model we wan—res.partner or Contact in this case—and open the
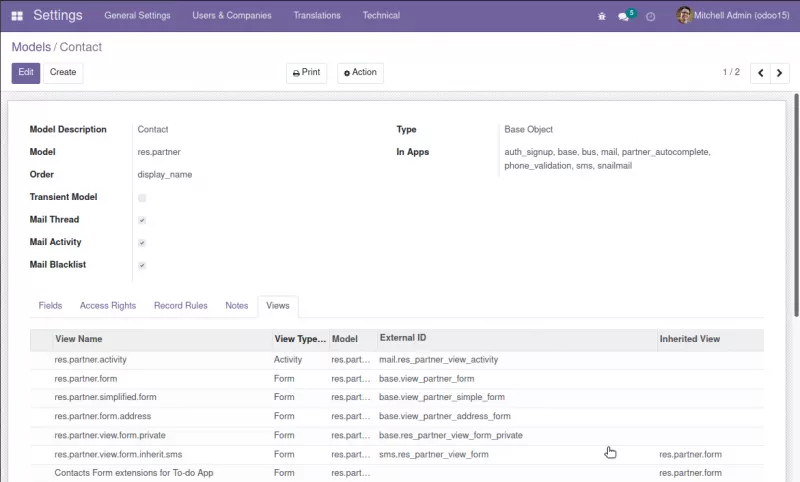
In the views tab we see all the view definitions for the selected Model. We can see records for the different view type, identified by the View Type column, and for base views and their extensions. Changing or adding view records is immediately effective, and the changes will be visible the next time the View is reloaded.
Sorting the list by View Type is helpful to see together all the extensions related to the same view type.
The base view is the one with an empty Inherited View field. A view type is not limited to a single base view. For example, the Contact Model (res.partner) has multiple base views available for the Form view, such as base.view_partner_form and base.view_partner_simple_form.
View also has a Sequence field. The base view with the lowest Sequence number is the one displayed by default. Visiting the form for the view definition, you’ll see a field with this Sequence value. Window Actions, used in menu items, can specify a particular base view to use. As mentioned, if no specific view is defined, the one with the lowest sequence should be used.
Building our Odoo development knowledge
We’ve now covered the items necessary for you to successfully add a custom field using the Odoo developer mode. In the next article, we’ll add to the knowledge base we’ve established here by learning to add a new model using the developer mode. From this point on, the order of each article’s release is designed to help us build from the details we’ve familiarized ourselves with so far, making for a nicely rounded four-article course that lays the groundwork for everything you need to start creating with Odoo development.
We hope this series on Odoo development gives you a taste of the value we place in the Odoo community—with powerful tools like Odoo, we can all begin to set the path we want our businesses to take.
Look out for “Adding a new Model using the Odoo Developer Mode” coming soon.
![]()
About the author
Daniel is a seasoned IT professional with extensive experience implementing business applications across a broad range of sectors. He’s worked with Odoo since 2010, back when it was known as Open ERP, and serves as a board member for the Odoo Community Association (OCA). Daniel is the managing director of Open Source Integrators.


