


The third of four installments on using the Odoo developer mode.
Covered in this article:
- How create a new model
- How to create Menu Items and actions
- How to configure access control security
- Using the superuser responsibly
Building the next level of complexity for our Odoo To-do application
In the previous article, we familiarized ourselves with how to add a custom field using the developer mode. Now, using the knowledge we’ve accumulated over the course of the last few articles, we’re going to add yet another level of complexity to our Odoo development knowledge by introducing how to create a new model and make it available to the users.
After reading this article, you’ll understand the ins and outs of adding a model to our Odoo To-do application, as well as how to navigate and implement various security restrictions to the users who have been granted access to it.
Creating a new model using the Odoo developer mode
Models are the basic components for applications, providing the data structures and storage to be used. We will create the Model for the To-do Items using three key three fields:
- Description text.
- Is done? flag.
- Work Team (A list of people collaborating in this item).
Model names should use the singular form, so the new model should be named To-do Item. The model technical name must be a valid database object identifier, so we should only use letters and underscores and avoid all other symbols. Since the models created through the Technical menu must have an x_ prefix, the technical name for the new model will be x_todo_item.
Model definitions are accessed in the Settings app, in the Technical | Database Structure | Models menu.
To create a new Model, go to the Models list and click on the Create button:
1. Fill in the basic definition values: Use To-do Item for the Model Description and x_todo_item for the model.
2. By default, the model will include the x_name field in the fields list. It is a Title when it is representing the record in lists or when it is referenced in other records. It can be used for the To-do Item title, so edit it to change the Field Label column accordingly.
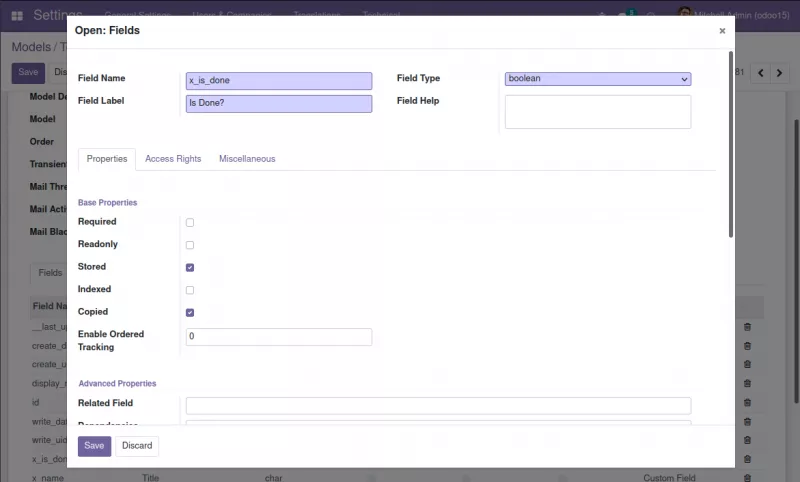
3. Next, add the Is Done? Field. This should be straightforward. Go to the Fields list and click on Add a line to open the new field form. Enter these values:
- Field Name: x_is_done
- Field Label: Is Done?
- Field Type: boolean
Once you’ve entered the values, click the save & close button, and then click save on the model form.
4. Next we’ll add the Work Team field, which may turn out to be a little more challenging. Not only is it a relation field—referring to records in the Contacts ( res.partner ) Model—but it is also a multiple-value selection field.
Fortunately, Odoo supports many-to-many relations. This is the case here, since a To-do Item can be related to many Contacts, and each Contact can be related to many To-do items.
Adding a Work Team field
To add the Work Team field, go the Fields list and click on the form Edit button. Then click on Add a line to open the new field form. Once you’ve done so, enter these values:
- Field Name: x_work_team_ids
- Field Label: Work Team
- Field Type: many2many
- Related Model: res.partner
- Domain: [(‘x_is_work_team’, ‘=’, True)]
Many-to-many fields have a few specific base properties: Relation Table, Column 1, and Column 2. These are automatically filled out for you and the defaults are good for most cases. These properties are discussed in more detail in Chapter 6 of Odoo 15 Development Essentials, ”Models – Structuring the Application Data.”
The domain attribute is optional and defines a filter for the records to be presented. We are using it here to limit the selectable Contacts to the ones that have the Is Work Team flag checked. Otherwise, all Contacts would be available for selection.
The domain expression to use follows an Odoo-specific syntax—it is a list of triplets, where each triplet is a filter condition indicating the Field Name to filter, the filter operator to use, and the value to filter against. A detailed explanation of domain expressions is given in Chapter 7 of Odoo 15 Development Essentials, “Recordsets – Working with Model Data.”
Tip:
- Odoo has an interactive domain filter wizard that can be used as a helper to generate Domain expressions. To use it, select the menu option Settings | Technical | User Interface | User-defined Filters. Once a target Model is selected in the form, the Domain field will display an +Add filter button for adding filter conditions. When doing so, the text box below it will dynamically show the corresponding Domain expression code.
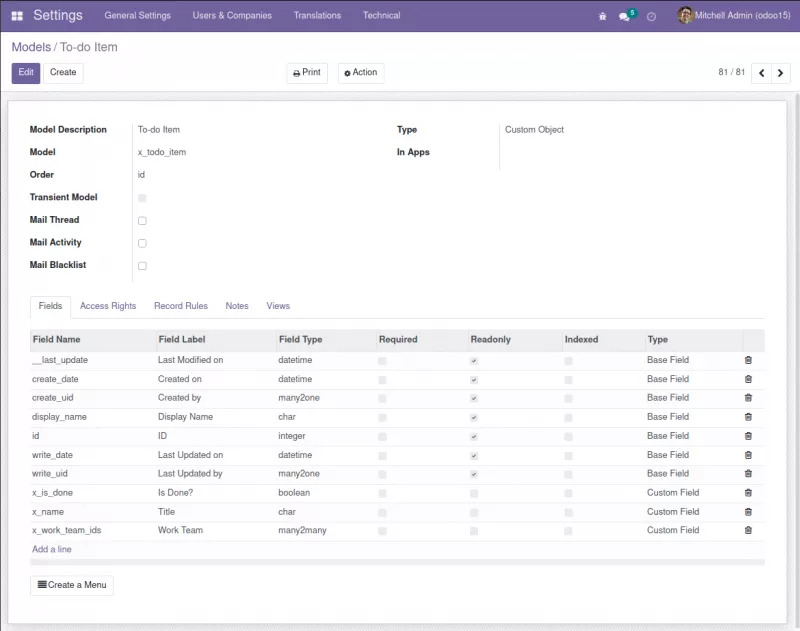
When finished, click on the Model form save button. Once the new Model is created, a few fields are automatically added. The ORM includes them in all Models, and they can be useful for audit purposes:
At this point, we now have the underlying model for the To-do app, but it is still not accessible by users. In the following section, we will learn how to configure access control security.
Creating menu items and actions in the Odoo developer
Now that we have a model to store the To-do Items, we need to make it available in the user interface. This is done by adding menu items to the user interface.
We will create a top-level menu item that directly opens the To-do list. Some apps, such as Contacts, work like this, while others have submenu items as shown in the top bar.
Menu definitions are in the Settings application, Technical | User Interface | Menu Items option:
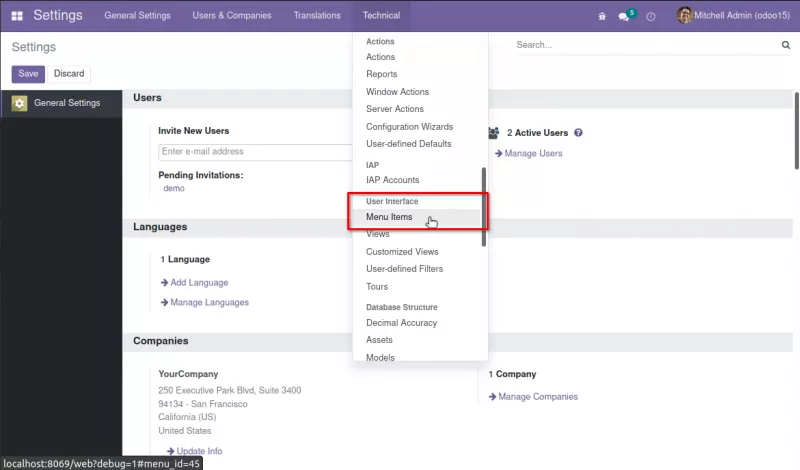
Navigate there, click on Create and enter the following values:
- Menu: To-do
- Parent Menu: (empty)
- Action: Select the ir.actions.act_window option.
- In the selection box next to the Action field, type To-do Items and select Create and Edit…This will open a Create: Action form.
On the Create: Action form set the following values:
- Action Name: To-do Items
- External ID Object: x_todo_item (the technical name of the target model).
- At this point the Action definition should look like this:
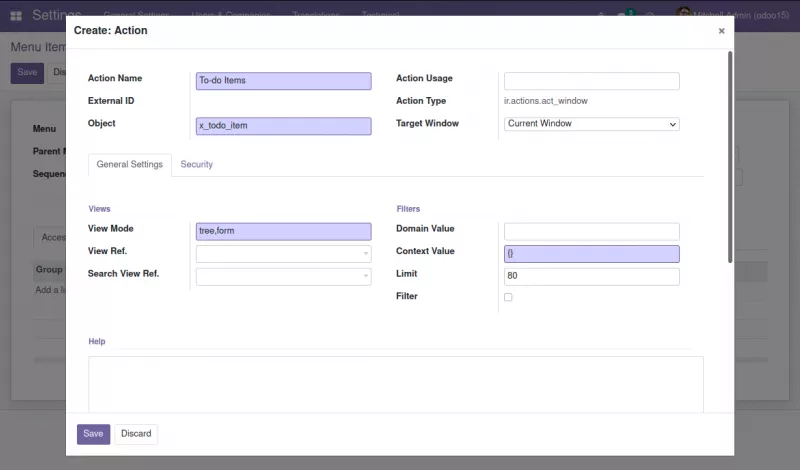
Save the action form, then save the Menu Items form. Once you’ve done so,
the menu item for the To-do application will almost be ready to use.
Changes to menus require a full browser page reload to be visible. In most browsers, the F5 key can be used for this. But if we try that now, we won’t be able to see the To-do menu option because our user hasn’t been given access to it yet.
Access security needs to be configured before the menu item is allowed to be presented to the users. We will go over the last section of this article, but before we get into that, it’s worth discussing a few more details about Window Actions.
Understanding window actions
In our case here, we added an action directly to a top-level menu item, with no child menu items. However, menus can be a tree of menu items, with parent/child relations. The leaf menu items have a related action, defining what happens when it is selected. This action name is what will be used as the title of the presented views.
There are several action types available, and the most important ones are Window, Reports, and Server Actions. Window actions are the most frequent ones and are used to present views in the web client. Report actions are used to run reports and server actions are used to define automated tasks.
At this point, we are concerned with window actions that are used to display views. The menu item just created for the To-do Item uses a window action that was created directly from the Menu Item form. We can also view and edit it from the Settings | Technical | Actions menu options. In this particular case, we are interested in the window actions menu option.
Tip:
- In many cases, it is more convenient to use the Edit Action option in the Developer Tools menu, providing a convenient shortcut to edit the Window Action that was used to access the current view.
Configuring access control security
Odoo includes built-in access control mechanisms. A user will only be able to use the features they were granted access to. This means that the To-do Items model we created is not yet accessible to the users.
The admin user before Odoo 12
The admin user is now subject to access control like any other user. In previous Odoo versions, the admin user was special, and bypassed security rules. This is no longer true, and admin must be granted access privileges to be able to access Model data.
Using groups to define access security
Access security is defined using user groups. A group defines access permissions to Models, sometimes called access control list (ACL). Users belong to groups. So, each user’s access depends on the groups they belong to.
At this point, we want to create a To-do group to be assigned to the users that should have access to this feature. We can also define record rules, sometimes called row level security, restricting the records each user can access.
For our project, we want the To-do Items to be private for each user, so users should only be able to access the records they create themselves.
Security groups
Access control is based on groups. A security group is given access privileges on Models, which is what determines the menu items available to the users belonging to that group. For more fine-grained control, we can also give access to specific menu Items, views, fields, and even data records, with record rules, explained in the next section.
The security groups are also organized around apps. Typically, each app provides at least two groups:
- User - Capable of performing the daily tasks.
- Manager - Able to perform all configurations for that app.
How to create a new security group for our Odoo To-do app
In the Settings top menu, navigate to Users & Companies | Groups, and create a new record using the following values:
- Application: leave empty
- Name: To-do User
- Inherited tab: add a line and select User types / Internal User
This is how it should look:
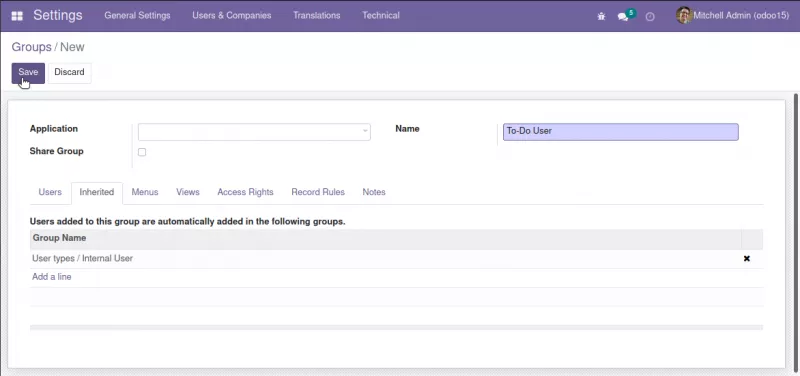
Our security Group inherits the Internal User group. Group inheritance means that members of this group will also be members of the inherited groups and will accumulate the permissions granted to all of them. Internal User is the basic access group, and app security Groups usually inherit it.
The Internal User group before Odoo 12
Prior to Odoo 12, the Internal User group was called Employee. This was just a cosmetic change, and the technical identifier (XML Id) is still the same as in previous versions: base.group_user.
Security access control lists
We can now grant to the Group / To-do User access to specific models.
The simplest way to do so is to use the access rights tab in the groups form. Add a line there using these values:
- Name: To-do Item User Access
- Object: Select To-do Item from the list
- Check all these boxes to grant their corresponding privileges: Read Access, Write Access, Create Access, and Delete Access.
These model ACLs are managed from the Technical | Security | Access Rights menu item.
Notice that we don’t need to specifically add access to the Partner model, since we are inheriting the Internal Users group which already grants access to it.
Assigning security groups to users
At this point we can try these new security settings, adding the admin user to this new security group:
1. Select the Users & Companies | Users menu item, open the Mitchell Admin user form, and Edit.
2. In the Access Rights tab, Other section, check the To-do User box to enable the security group for this user. Select it and save the form.
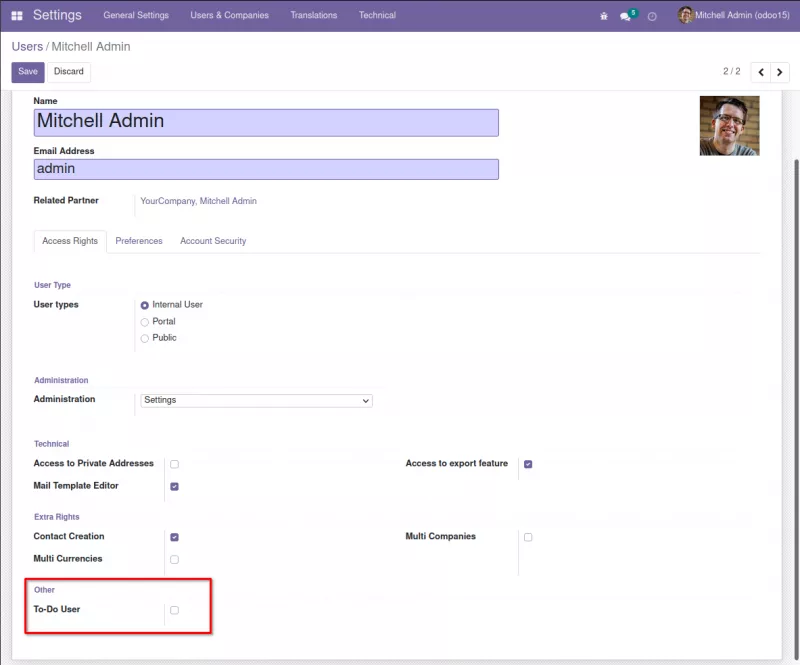
If everything went as expected, you should be able to see the To-do app top menu. Reload the browser page to force a refresh of the menu items.
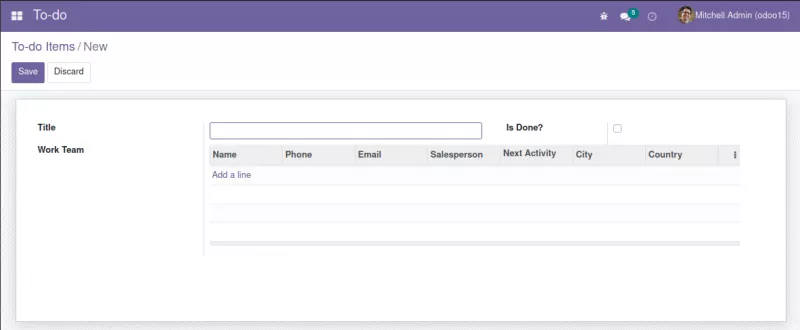
We haven’t created any view for it yet, but the Odoo framework will automatically generate some basic views for us:
Security record rules
When given access to a model, users will be able to access all of its records by default. But in some cases, we may need to restrict what records each user is able to access. This can be done using record rules.
Record rules set Domain filters on Models that are enforced when read or write operations are made on it.
For example, in our To-do app, the To-do Items are expected to be private to each user, so we want each User to only see their own items. We should create a record rule with a filter to show only the records created by the current User. With that in mind, consider the following:
- Records have a create_uid field automatically added by the framework, which stores the user that created the record. So we can use it to know who owns each record.
- The Domain evaluation context includes a user variable, containing a browse record for the current user. So we can use dot notation on it to access its attributes, such as the user.id.
We can use this in a domain expression to achieve our goal:
[(‘create_uid’, ‘=’, user.id)]
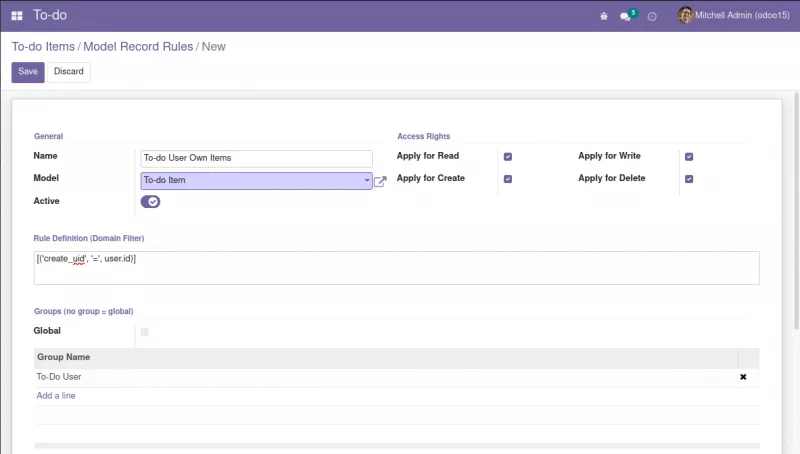
Record rules are available in the Settings | Technical | Security | Record Rules menu, or in the developer menu option View Record Rules. Navigate there and create a new record rule with the following values:
- Name: A descriptive title, such as To-do User Own Items.
- Model: Select the Model from the list, To-do Item in our case.
- Access Rights: The actions where the rule will be applied. Keep all of them checked.
- Rule Definition (Domain Filter): [(‘create_uid’, ‘=’, user.id)]
- Groups: The security groups it applies to. Click on Add a line and select the To-do User group.
This is what the record rules definition will look like:
And we’re done. You can now try this new rule by creating a couple of To-do items with both the Admin and Demo users. Each should be able to see only their own items.
Understanding the Superuser account
Odoo includes an internal root-like superuser that has special privileges and is able to bypass security controls. It is used for internal operations, or actions that need to ignore security controls. This superuser is named OdooBot and is automatically generated upon database creation, and has database ID 1.
The default admin user before Odoo 12
Prior to Odoo 12, the default admin user used for system setup was also the superuser. This means that the admin bypassed access control by default. However, this is no longer the case. After Odoo 12, the default admin is a regular user, but set by default as Manager on all Odoo Apps.
Using the superuser responsibly
The superuser has no login password, but it is possible to enable it. When logged in as a user with the Admin \ Setting group, the become superuser option is then available in the Developer menu.
It is also possible to directly go into superuser mode at the login screen. For this you need to enable the developer mode, editing the URL to add ?debug=1 (for example, http://localhost:8069/web/login?debug=1). Then the Login as superuser option will be available below the Login button.
When the superuser is enabled, the current user is shown as OdooBot in the upper-right corner. Note that the colors in the upper-right area change to yellow and black stripes when the superuser is enabled.
Caution:
- Using the superuser should be done only if absolutely necessary. The fact that the superuser bypasses access security can lead to data inconsistencies. For example, in a multi-company context, the superuser could potentially compromise the integrity of shared data. If at all possible, using the superuser should be avoided.
Preparing for the final step in our Odoo development series
At this point in our exploration of the Odoo developer mode, we’ve covered items such as the structure of Odoo architecture, how to enable developer mode, how to add a custom field to a model, and how create a brand new model using the developer mode.
For our final slot in this four-part series, we’ll outline the steps necessary to add and create different kinds of views. This will effectively bring our To-do app project to a close, but there is always plenty more information for sharpening your Odoo development skills when you dive head first into the source of these articles’ Odoo development expertise: Odoo 15 Development Essentials.
Look out for the fourth and final installment coming soon.
About the author
Daniel is a seasoned IT professional with extensive experience implementing business applications across a broad range of sectors. He’s worked with Odoo since 2010, back when it was known as Open ERP, and serves as a board member for the Odoo Community Association (OCA). Daniel is the managing director of Open Source Integrators.


